Chicken Cauliflower Fried Rice

Last night I was craving something healthy (I never thought the day would come in my pregnancy when I would say that!), so I decided to spruce up an old classic. I took my original Cauliflower Fried Rice recipe, added some chicken to it, and tweaked some of the ingredients. Let’s get started!

Ingredients:

  • 1 head cauliflower
  • 3 cloves garlic, chopped
  • 4 green onions, chopped
  • 1/2 large red onion
  • 2 eggs
  • 2 lbs. lean chicken breasts, chopped
  • Extra virgin olive oil
  • 1 tbsp soy sauce (omit for Specific Carbohydrate Diet)
  • 1 tsp Worcestershire sauce (omit for Specific Carbohydrate Diet)
  • Salt, to taste (I like using Himalayan Pink Salt that you can freshly grind yourself; I feel it tastes more mild than other salts)
  • Freshly ground pepper, to taste

Preparation:

For this part, you can refer to my original post, as I pretty much prepared it in the same way, except this time, I sautéed the garlic last. So, after cooking your red onions, add your green onions, then add your garlic. Since garlic burns quickly, I felt it would be best to hold off on cooking it until the end.

Image

I also sautéed the chicken in a separate pan for about 15 minutes until it turned golden brown. Then, I added the chicken and eggs to the cauliflower fried rice last, after I had added the final two ingredients of soy and Worcestershire sauces.

Here is the finished product!

Image

The end result was a delicious, satisfying, and completely guiltless meal. The chicken was a nice touch, as the protein helped keep me full longer than usual. And, I have to add that even if you don’t like cauliflower, you will like this dish because once you sauté the cauliflower, there is no real cauliflower taste. The cauliflower  acts as a nice substitution for rice without the calories.

Bon appétit!

Banana Ice Cream

Have you ever craved ice cream but wanted to spare the calories (and the guilt?) Well, then, I have a treat for you! You can make healthy ice cream (I know, sounds like an oxymoron) with just one simple ingredient: bananas!

All you need are bananas, which you’ve frozen ahead of time. For the picture below, I used two frozen bananas and pulsed them in my food processor until they turned creamy. If your bananas are super frozen, it will take a few minutes until they turn smooth. You’ll just want to keep taking off the lid to your food processor, scraping the sides, and pulsing the bananas until they turn into an ice cream consistency.

Image

If you want it to have the true ice cream look, you can freeze your ice cream after you food process it; then, after a few hours, scoop it with an ice cream scooper. It will then look like this:

Image

And, if you want to get really fancy (like I was in the picture above), you can add 1 tablespoon of all-natural, no sugar added peanut butter after pulsing your bananas.

It doesn’t get much tastier and healthier than that!

Enjoy!

Cauliflower Fried Rice

For a while now, I’ve heard about cauliflower fried rice and always wondered how cauliflower could match the consistency of rice itself. It wasn’t until I started the SCD and began experimenting with cauliflower more that I realized, strangely, it can take the place of rice and actually make you feel really full. I saw a handful of recipes for cauliflower fried rice on Pinterest and adapted one of my own. It’s a fairly easy recipe and took me 45 minutes to make, from start to finish.

Ingredients:

  • 1 head cauliflower
  • 3 cloves garlic, chopped
  • 1/2 c. green onions, chopped
  • 1 small white onion, chopped
  • 1 c. broccoli, cut into florets
  • 1/2 tsp coconut oil
  • Extra virgin olive oil
  • 4 eggs
  • 1 tbsp gluten-free soy sauce (omit for Specific Carbohydrate Diet)
  • 1 tsp gluten-free Worcestershire sauce (omit for Specific Carbohydrate Diet)
  • Sea salt, to taste
  • Pepper, to taste

Preparation:

Get your cauliflower and take off all its leaves, discarding them.

Image

Rinse your cauliflower with water. Cut your cauliflower in half and then, into small pieces, cutting and discarding the stems, so that it fits nicely in your food processor.

Image

Place your cauliflower inside your food processor. I used my Ninja.

Image

Pulse the cauliflower until it resembles tiny, rice like pieces.

Image

I pulsed mine into two batches, since I didn’t want to overflow my Ninja.

After pulsing (it took me about 3-4 pulses), remove the cauliflower and empty it into a bowl.

Image

Now, chop up your onion, green onions garlic, broccoli, and set out your eggs.

Image

Drizzle a large nonstick pan with olive oil.

Image

Add your cauliflower.

Image

Saute your cauliflower for 10 minutes. 5 minutes into it, add your broccoli.

Image

After the full 10 minutes has passed since you started sauteing the cauliflower, add your onions and cook until translucent.

Image

Add the coconut oil, wait a few seconds for it to melt, and start sauteing the garlic.

Image

Add the green onions.

Image

While the green onions are cooking, get a smaller nonstick pan for your eggs and spray with cooking oil.

Image

Crack your eggs inside the pan.

Image

Start scrambling your eggs inside the pan.Image

Once your eggs have scrambled, turn off the heat.

Add your soy sauce to the other pan with the cauliflower fried rice, as well as your Worcestershire sauce. Add salt and pepper, to taste.

Image

Add the eggs to the cauliflower fried rice.

Image

Mix everything together.

Image

Remove from heat.

Image

Voila!

Image

Now, go see how many people you can fool into thinking this is real rice!

Enjoy!

Apple and Berry Crumble

I’ve been slacking, somewhat, lately, when it comes to experimenting with new dishes. In the past few weeks, the latest I’ve tried have been this apple and berry crumble, as well as cauliflower fried rice (which is amazing!) The apple and berry crumble is perfect for those moments when your sweet tooth gets the best of you but you still want to eat something clean.

Ingredients:

  • 2 apples, peeled and cut into chunks
  • A handful of mixed frozen berries (I use Costco’s Kirkland brand of Nature’s Three Berries, which has raspberries, blueberries, and marionberries)
  • 1 egg white
  • 1 c. almond flour
  • 1 tbsp coconut oil, melted
  • 1 tbsp lemon juice
  • 1 tsp cinnamon
  • Honey to drizzle on top

Preparation:

Spray a 8 x 8 dish with cooking spray and add your apples and berries. Mix the egg white, almond flour, coconut oil, and lemon juice. Separate your “crumble” into chunks and crumble on top of your fruit. Sprinkle the cinnamon. Drizzle honey on top. Bake at 400 degrees for 20 minutes.

Apple and Berry Crumble

This dessert is so heavenly! I was a little worried tomorrow’s leftovers would turn soggy from the almond flour crumble but it held up nicely.

Enjoy!

Wajito

You’re probably wondering what the heck the title of this post means. Well, it’s the name of a summer drink and it was actually “invented” over the weekend at a friend’s house. The weather was hot and we wanted something to cool down with. My friends decided to make watermelon slushies. That’s when I suggested we throw some fresh mint in there, too. So, I give you not a mojito but a virgin wajito!

Ingredients:

  • 3 c. watermelon
  • 1 c. ice
  • A few sprigs of fresh mint

Preparation:

Throw everything together in your blender, blend, and enjoy! Garnish with some fresh mint on top.

Image

Simple enough and very refreshing!

Enjoy!

Almond Flour and Coconut Flour Pancakes

This recipe is a play on my original almond flour pancakes recipe I posted a few months ago. Since coconut flour gives everything a subtle and deliciously sweet taste, I decided to experiment with it. These pancakes turned out fluffy, moist, and so good; I loved the little chunks of coconut inside the pancakes as I ate each bite. I doubled some parts of my original recipe. This recipe makes about 6 pancakes.

Ingredients:

  • 1/2 c. almond flour
  • 1/2 c. coconut flour
  • 4 eggs
  • 1 tbsp vanilla
  • 1/8 tsp salt
  • 1/8 tsp baking soda
  • 1 tsp coconut oil (for cooking the pancakes in; I used Trader Joe’s organic virgin coconut oil)

Preparation:

Mix the ingredients together (except for the coconut oil.) Heat your nonstick pan up with your coconut oil. Pour the pancake batter by 1/4 cupfuls onto your pan. Cook for about a minute to a minute and a half on each side (turning when the edges are dry and bubbles form on the surface of the pancake.) After removing from the pan, layer a piece of butter in between each pancake. Drizzle honey on top and enjoy!

Image

Fried Banana

We’ve all been guilty of buying bananas, with the best intentions of eating them, only to see them ripening away on the counter, untouched. Instead of throwing them into a smoothie or frantically searching your cupboards for ingredients to bake them into something, why not fry them into a delicious treat? The best part of this recipe is that you need only a few ingredients, which you most likely have lying around the kitchen.

Ingredients:

  • 1 banana
  • 1 tsp coconut oil
  • A dash of cinnamon
  • A drizzle of honey

Preparation:

Heat a nonstick pan with the coconut oil. Wait a minute and allow it to heat up. Take your banana, cut it in half, and then cut it lengthwise down the middle, so that you have four pieces of banana. Lay each piece in the pan on the coconut oil. Fry on medium heat for 2 minutes on each side. flipping with a spatula. Remove your banana from the pan and transfer onto a plate. Sprinkle with cinnamon and drizzle lightly with honey.

Image

This is great as a snack (especially for pre and post-workouts), for dessert, or even for breakfast! It’s simple to make, tastes delicious, and is healthy. And, you’ll be sparing your bananas from being thrown away, too!

Enjoy!

SCD Legal Stuffed Bell Peppers

A few months ago, I posted a stuffed bell peppers recipe that wasn’t SCD legal. Now that I’m on the SCD, I’d been wanting to modify that recipe. This afternoon, I did just that, and let me tell you, the stuffed bell peppers I made today taste 100 times better than my original recipe!

Ingredients:

  • 12 red bell peppers
  • 1 1/2 pounds lean ground turkey
  • 1 large tomato, chopped
  • 1 c. fresh cilantro, chopped
  • 3 cloves fresh garlic, chopped
  • 1 small red onion, chopped
  • 3 c. Campbell’s tomato juice (in order for it to be SCD legal, the tomato juice you use can’t have tomato paste in it. It’s been reported that V8 has tomato paste, which is why I use Campbell’s brand.)
  • 1/2 c. Monterey Jack Cheese, shredded
  • 1/2 c. cheddar cheese, shredded
  • 1 tbsp extra virgin olive oil
  • 1 tsp dried basil
  • 1 tsp dried oregano
  • 1 tsp dried Italian seasoning
  • Sea salt (I love pink Himalayan sea salt!)
  • Pepper

Preparation:

Just like my original recipe indicates, you’ll want to wash your bell peppers, cut the tops off, and remove the seeds and membranes. This time, I also kept the stems, instead of discarding them like last time. Place them in a pot of salted, boiling water. Boil for 7 minutes. When it’s time to remove them from heat and rinse them in a colander, the skins of your bell peppers should look shriveled up. This is what you want! Last time I made my stuffed bell peppers, the skins hadn’t wrinkled, yet, so the bell peppers were a little crunchy, even after being in the oven for so long.

Put your bell peppers aside to cool a bit and let’s move on to preparing the stuffing.

In a large nonstick pan, cook your ground turkey. Drain the fat in a bowl once the turkey has browned. Add a tablespoon of olive oil and saute your onions until they become translucent. Add the garlic, basil, oregano, Italian seasoning, tomatoes, cilantro, salt, and pepper. Add 2 cups of the tomato juice and stir your stuffing, so that it mixes well and the flavors distribute evenly.

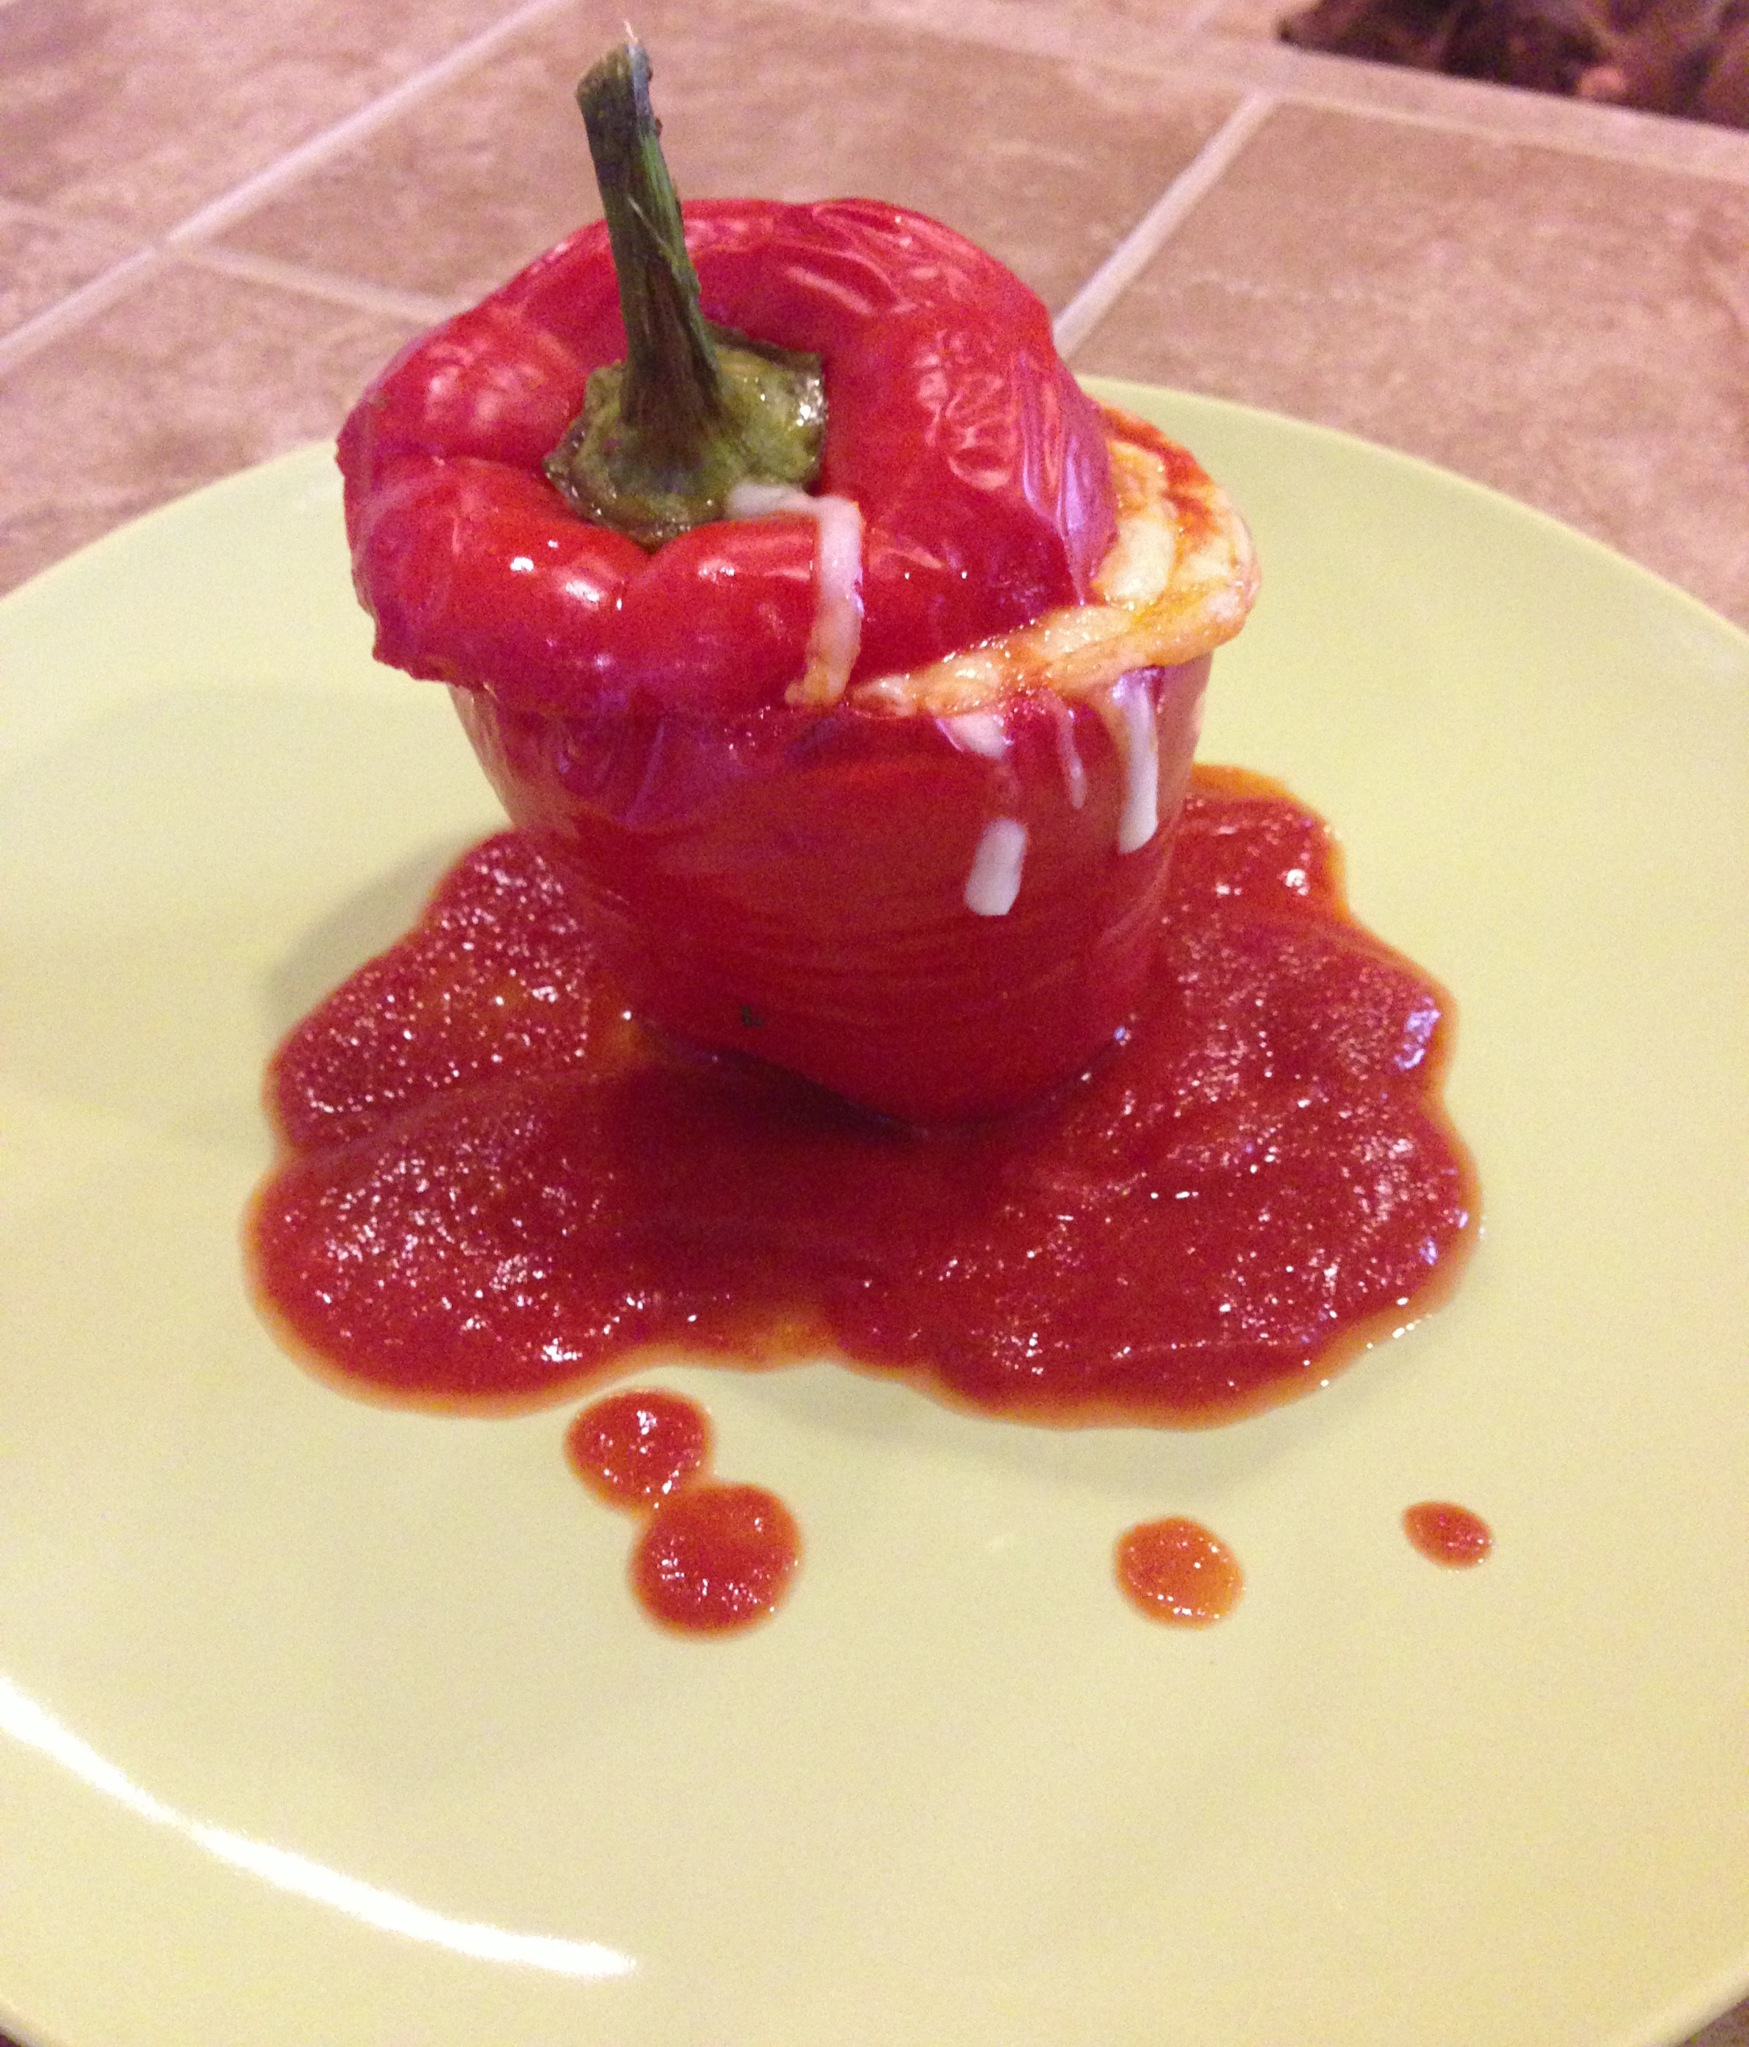
Spray the bottom of a 13 x 9 Pyrex with cooking spray. Cover the entire bottom of the Pyrex with the remaining 1 cup of tomato juice. Grab each bell pepper, sprinkle the inside with sea salt, and stuff the bottom with a small amount of Jack and cheddar cheese. Add your stuffing so that it fills up half of your bell pepper, sprinkle with cheddar cheese, and fill the rest of your bell pepper up with more stuffing. Place your bell peppers on the tomato juice in the Pyrex.

Put your bell peppers inside a 350 degree heated oven with their lids on top. Cook for 25 minutes. After 25 minutes, remove your bell peppers, take off their stems, and sprinkle your bell peppers with a mix of Jack and cheddar cheese. Place the stems inside the Pyrex but not on the bell peppers. Cook for 8 minutes, until your cheese nicely melts and browns.

Image

ImageImageImage

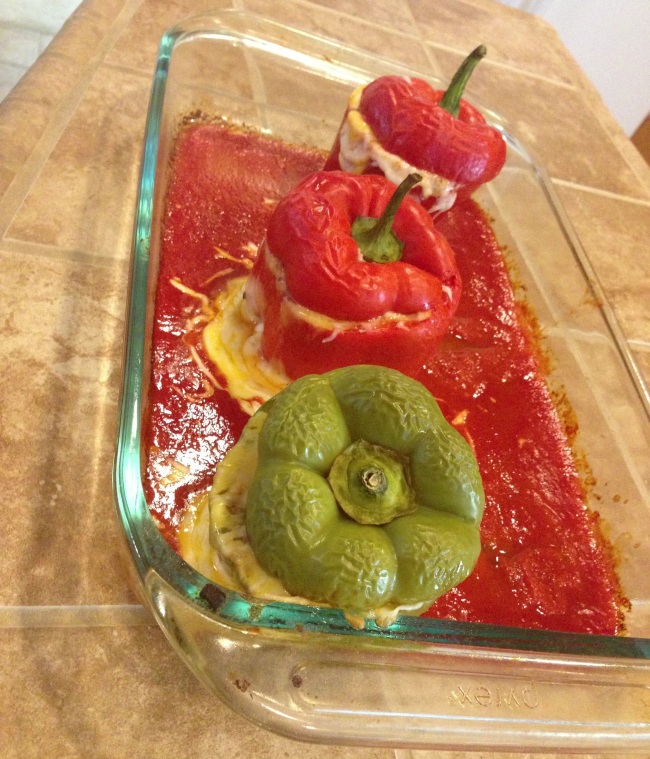
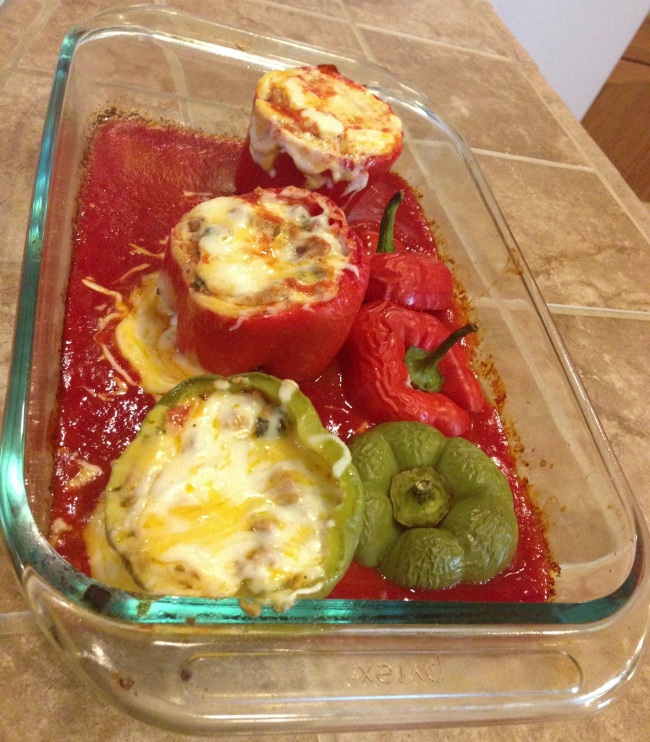
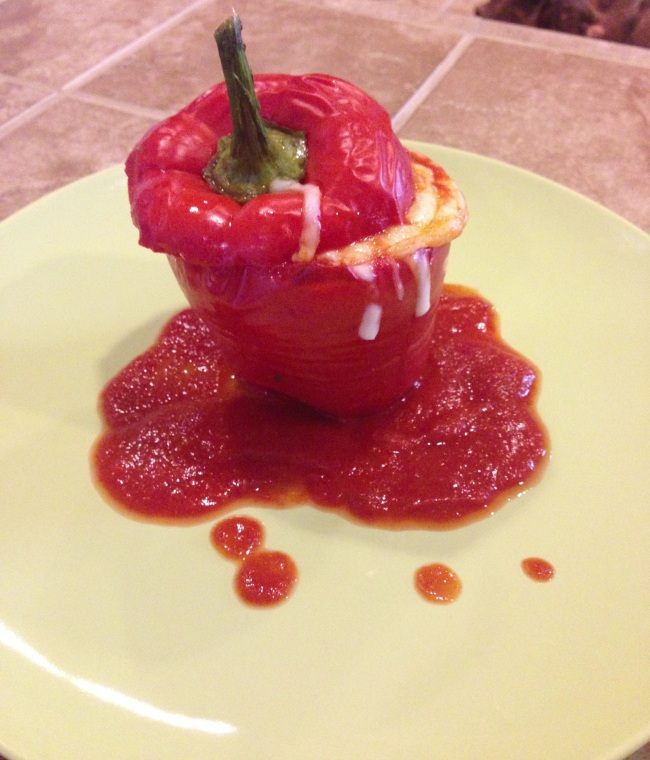
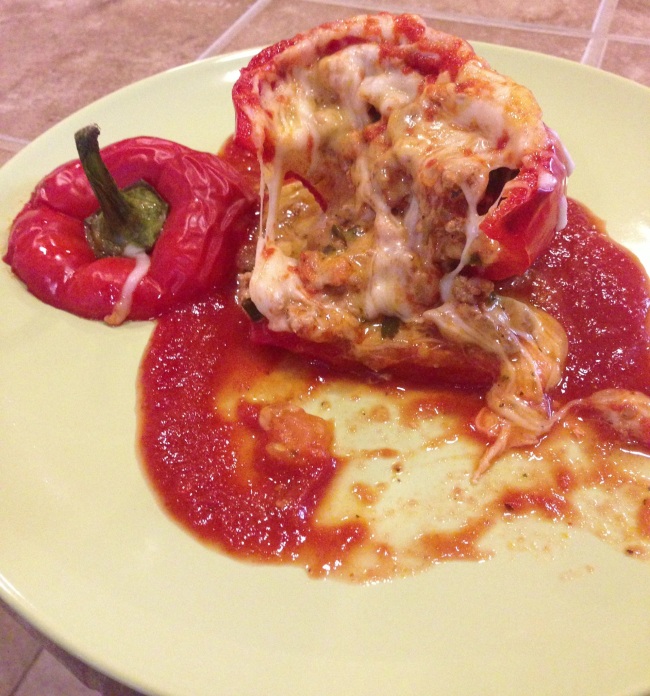
I threw one green bell pepper in there for aesthetic purposes but generally speaking, red bell peppers are so much sweeter than their green counterparts and add so much more juicy flavor. Although my modified stuffed bell peppers recipe today had way fewer ingredients than my original stuffed bell peppers recipe, it tasted a whole lot better! I felt having fewer ingredients helped bring out all the flavors more. Also, boiling the bell peppers longer in water helped soften them, which added to this dish’s flavor.

On a side note, the stuffing obviously is enough for more than 3 bell peppers but that’s all I had on hand. I would guess this recipe could easily fill a dozen bell peppers total.

These stuffed bell peppers are ooey, gooey, cheesy, and delicious! I will definitely be making them more often in the future. I hope you try your hands at them. If you do, be sure to let me know how they turn out.

Enjoy!

Grain-Free Donuts

Being on the SCD can be tough for many, since you inevitably miss a lot of the old foods you used to be able to eat. Luckily, we live in a time where Google exists, so finding a proper substitution for your favorite foods is just a few clicks away! The other week I found a grain-free donut recipe. I wasn’t sure how the consistency of the donuts would be but to my surprise, the donuts turned out very moist and fluffy! They also taste divine! The “frosting,” which is made up of food processed dates, raisins, peanut butter, vanilla,  cinnamon, and coconut oil, is so out-of-this-world delicious. I never knew food processing ingredients like that together could come anywhere close to resembling and tasting like real frosting.

I didn’t have a donut pan, so I had to make a trip to Target to pick one up. It was a small price to pay for how delicious these babies turned out! The original recipe can be found here:

http://www.texanerin.com/2012/05/grain-free-cinnamon-roll-donuts.html

I almost followed the recipe to a tee; the only substitution I made was swapping out the almond butter for peanut butter, since I didn’t have almond butter on hand.

My fear before making these was that they would taste too much like almonds because of the almond flour base. But, I think what really masks the almond flour taste is the addition of cinnamon, coconut oil, and nutmeg! Also, for the frosting ingredients, I would strongly recommend using the coconut oil, though the author of the recipe mentions that she might leave that out next time she makes them. The addition of the coconut oil ensures your frosting is as smooth as possible and easily spreads onto your donuts.

Word to the wise, don’t try to spread your frosting on while your donuts are piping hot or else you’ll ruin your donuts. Wait about 2-3 minutes, so that they’re still a little warm, and then, spread your frosting.

Image

These donuts are so good that words can’t even describe them! Try them for yourself. They definitely make me not miss the traditional sugar-laden donuts.

Enoy!

Cauliflower Crust Pizza

When I found out about almond flour crust pizza, I thought whoever came up with it was brilliant. That’s until I heard about cauliflower crust pizza. I heard of this amazing pizza crust a few months ago and had been itching to try it ever since. But, since I didn’t have a food processor and didn’t feel like grating the cauliflower by hand, I put it off. Luckily, I just bought a food processor, so, I’ve been trying out all sorts of recipes, including this one!

I found two recipes online and switched between the two to make my pizza. The recipes can be found here:

Basically, I’m going to list out which parts of the two recipes I followed. The recipes call for medium heads of cauliflower. The cauliflower I bought seemed large, so, I used only half of it, only to have to go back and repeat the process to use the other half, since it barely yielded any “dough.” After food processing my cauliflower, I microwaved it for 4 minutes, like the first blog, The Lucky Penny, says. I also used all of the ingredients she listed in order to make the crust (which, I must add, turned out to be amazing!), including the almond meal, minus the red pepper flakes (I used regular black pepper.) Adding the egg white is listed as optional but I advise you use it because it helps the dough bind together better. I found that without the egg white, my dough wasn’t adhesive.

I used Closet Cooking’s cooking times, since my pizza crust was pretty thick. I baked my crust for 20 minutes. You’ll notice when it’s done, as it’ll give off a nice light golden brown color. After taking it out of the oven, I layered my pizza with mozzarella cheese (as much as you want), spinach, green onions, red onions, tomatoes, and turkey pepperoni. For those on the SCD, we can’t eat commercially bought pizza sauce, so, I left that out. I then put a final layer of mozzarella cheese on top, in order make all the toppings stick. I put my pizza back in the oven and baked for 10 minutes and broiled for another 3 minutes. Just remove your pizza from the oven when your cheese melts and begins to bubble. When it’s ready, you’ll be able to tell.

My first impression of this pizza was that it’s absolutely incredible! My husband is often my guinea pig, since he gets to try my recipes before they, “hit the public.” He seriously couldn’t stop talking about how fabulous it tasted. You really can’t tell it’s not “real” pizza, either. The cauliflower taste isn’t even noticeable, especially since the pizza crust recipe is jam packed with all those flavorful herbs! Plus, the only real fattening part of this pizza is the cheese, so, really, how can you go wrong with this recipe? I can’t imagine how much more amazing it would have tasted had I added some sauce to it but we didn’t notice any difference in flavor.

The best part is that the actual crust looks like real pizza crust. Just be sure to ring out all the water after you microwave your cauliflower, so that your crust doesn’t become soggy. We probably wrung out about a cup of water. If you’re like me and don’t have much hand strength, ask your husband or significant other to ring it out for you!

Here’s the masterpiece, in all its magnificent glory:

Image

Image

I urge you all to try this incredible pizza! If you have kids and are trying to sneak some healthy options into their meals, I guarantee you they will love this and that they won’t be able to tell the difference!

Enjoy!